Russian twist
The Russian twist is probably one of the best known exercises for abdominal wall training.
As well as being remarkably famous in the fitness world it is also known for its difficulty. This is because it allows, in addition to the free body execution, an increase in difficulty with the addition of weights or discs.
Now let's try to better understand in detail all the facets of this excellent exercise for the core.
As we just said, the russian twist trains the abdominal wall. However, it is necessary to highlight the fact that it predominantly affects the lateral wall of the abdomen: the obliques.
This muscle, commonly known as “External oblique” is a rather bulky muscle which contributes to the formation of the abdominal wall.
It is considered the largest muscle of the entire wall and is the muscle par excellence placed most on the surface.
Muscles involved
In detail, the external oblique muscle originates from the outer and lower edge of ribs 5-12. It is inserted in the iliac crest and in the linea alba and performs numerous functions.
Esso compresses the abdomen, lowers the ribs, flexes laterally or rotates the spine on the opposite side.
When we talk about obliques, however, it is necessary, don't forget the internal oblique. Located internally with respect to its namesake, it originates from the iliac crest and the thoracodorsal belt.
It inserts into the lower surfaces of the ribs 9-12, into the rib cartilages 8-10, into the linea alba and into the pubis.
It too performs numerous functions like the previous one: compression of the abdomen, lowering of the ribs, lateral flexion or rotation of the spine on the same side.
Having examined in detail the anatomy of the target muscles of this exercise, we now see the execution and the possible variants.
How is it done?
there 2 types of executions. The choice of one or the other depends on our level of preparation and the degree of difficulty that we want to give to the execution of the same.
1. Facilitated Execution
The first variant is considered the facilitated one. This is thanks to the fact that the feet are placed on the ground.
So here's how to proceed with this type of gesture.
- The initial position requires you to be seated on the ground, with your feet resting on the ground 30/40 cm away from you.
- At this point, lean your back back until you create a 45 ° angle between your torso and thighs.
- This is the starting position to get.
- At this point the execution consists in a rotation of the torso to one side, performed very slowly, with the respective return to the initial position.
- Then perform on the other side as well and continue until you reach the number of repetitions you need to perform.
- In case you initially find it difficult to keep your feet firmly on the ground, the use of people or tools is recommended.
- For example, you can get help from the spotter by having your feet fix your feet with your hands. However, if you have it available, help yourself with an abdominal bench, inserting the instep under the appropriate stop.
2. Complex Execution
The second variant, much more difficult and demanding, provides for the same motor reproduction of the previous description, with the addition of feet in suspension.
In this case, in fact, your feet will be off the ground, proposing an initial position in isometry with a V-Up.
The stability will therefore rest only and exclusively on the buttocks.
We can therefore understand how in addition to being in itself a difficult exercise for the abdominals, implementing it with the loss of balance increases its intensity.
With this variant it is possible to train balance and proprioception with greater focus, subjecting yourself to considerable physical and mental effort.
Overload
Both of the variants just examined have one trait in common: the possibility of being made even more training.
How? Simple, with adding an overload.
Therefore, according to our needs, our abilities and the intensity that we want to guarantee to this motor gesture, it is possible to take advantage of kettlebells, discs, dumbbells and so on and so forth, in order to overload the exercise.
What is certain is that this approach is suitable for those who already easily master both executions.
As with any self-respecting motor gesture, before making it more difficult, it is good to make sure that the basic execution is correct and qualitatively training.
Common mistakes
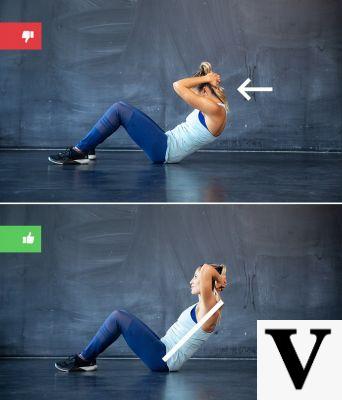
The worst mistake to absolutely avoid is that of wanting to speed up the execution of the Russian twist. In fact, it must be done slowly, taking care of breathing.
Another mistake to avoid when reproducing the gesture is that of do not alter the angle between the torso and thighs. It must remain so throughout the ROM, without dirtying the exercise.
Start gradually, take care of your execution and have a good workout.