A practical and immediate technique to find calm, even in the most stressful situations.

"Exercise your calm and you will dominate any situation."
Justinian.
Study, work, meetings, exams: our days often resemble chaotic races, where it is difficult to catch your breath. We can barely resolve an urgency, which immediately presents another, in an endless cycle that deprives us of all the energy and motivation necessary to pursue our most ambitious goals. We are constantly under stress and we live in the spasmodic wait for the next "lay-by" to arrive.
Is this really the only way to (survive) live in this society? Is it possible that there is no alternative? What would our life be like if we could cope with emergencies and daily challenges with calm and tranquility?
In the previous post, I told you aboutButterfly Effect and the power of choices. Of course, we cannot choose (i.e. control) everything: despite our best efforts, there will always be emergencies to deal with. However, we can choose how to react to these emergencies: by panicking or keeping calm and cool.
In today's article I want to offer you one breathing technique, not very well known, but extremely effective, which, practiced consistently, will allow you to face even the most stressful situations calmly and serenely. A deep breath and ... let's go!
Breathing in 4 stages
I have already told you in the past about some breathing techniques for relaxation, first and foremost diaphragmatic breathing. The technique we will talk about today was devised by Dr. Randy Paterson, PhD in Psychology at the University of Western Ontario, and takes up, at least in part, this principle of diaphragmatic breathing, but represents, in my opinion, a remarkable evolution. Before seeing it in practice, however, a brief note.
Author's note: breathing is the most natural thing that can exist and breathing techniques are not harmful in themselves, but if you are aware of respiratory problems, before practicing what is suggested in this article, ask your doctor for an opinion. caring.
Having said that, below you will find all the details to practice the 4-step breathing. Let's start with what we could define as the “0” phase, that is the preparation.
Preparation
A key, and often overlooked, aspect of relaxation techniques is the preparation period. In fact, we are used to stifling any feeling of discomfort with some "magic pill": headache? Pill! Bellyache? Pill! Backache? Pill! Even when we are agitated and nervous we would like the relaxation techniques to work like "magic pills"; but practicing a relaxation technique for the first time in a time of great stress is the worst of the choices you could make. Whichever technique you start using while you are nervous, your brain will reconnect to that state of discomfort (a bit like it did for Pavlov's dog).
Relaxation techniques, to ensure their effectiveness, must be initially practiced in a "protected" environment and in one state of calm e tranquility. We will then see, in the final part of the article, a gradual program that will allow you to take advantage of all the benefits of breathing in 4 phases, even (and above all) in moments of maximum tension.
 So find a quiet room in your home where you can relax for at least 5 minutes without being disturbed. The ideal moments to put this technique into practice are there morning, after waking up, and the will be, before going to sleep.
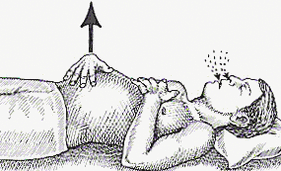
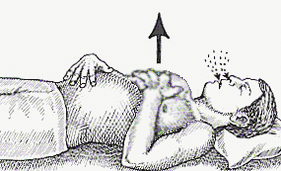
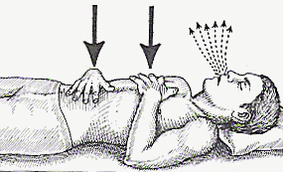
At this point, lie down on the bed (or on the sofa) and place your left hand on your chest and your right hand on your abdomen, as shown in the image on the side. If everything is clear to you, all you have to do is close your eyes, relax and move on to the next step (not now! Eyes open and read on ;-)
Phase 1: Diaphragmatic inspiration
 Inspire slowly using only your diaphragm.
To carry out this phase correctly, your right hand will have to move upwards, pushed by your abdomen which in the meantime will inflate like a "balloon". Your left hand, on the other hand, the one resting on your chest, must remain motionless. In short, a bit as if "I was breathing with my belly".
When your abdomen is swollen, you can move on to phase 2 without pausing.
Phase 2: Chest inhalation
 Keeping your abdomen elevated, and without letting the air out of your lungs, you will need to do one second inhalation, using your chest this time.
This second phase will seem a bit strange to you, after all you had already inhaled in the previous phase, but it is necessary to guarantee you a deep and complete breathing.
To perform this step correctly, you will need to feel your left hand rise, propelled by your rising and widening rib cage.
Do not force this second inhalation: it need not be of the same intensity as the first; just widen your ribcage using the intercostal muscles. You can then move on to step 3, again (very important) without any pause.
Phase 3: Exhale
 In this third stage, you will need to relax your muscles and let theair come out naturally from your lungs: please do not force the exhale in any way.
In this phase you will feel your hands go down and you will be pervaded by a general sense of well-being. Let yourself go completely, do not try to limit the air that is coming out of your lungs in any way.
In such cases, it can be very helpful to imagine the tension as a black smoke that leaves your body. Once you have completed the exhalation, move on to the fourth and final phase.
Phase 4: Pause
After exhaling all the air in your lungs hold your breath for 3-5 seconds.
It is not a freediving competition: also in this case, no forcing. Hold your breath just for a few seconds, until your body wants to breathe in new air. As soon as you feel this desire, start breathing again, starting from Phase 1 and repeating the entire cycle.
Well, what do you think? As you may have read, nothing esoteric or sci-fi: 4-step breathing is a technique that is as simple as it is effective. In case you have any doubts, I tried to answer the most frequent ones in the next section.
Some useful clarifications
Applied in combination with the three-dimensional thinking, 4-step breathing can be a terrific relaxation technique; but it is advisable to practice it in the correct way. Below you will find the answers to the most frequent doubts about this breathing exercise.
How long do I have to breathe like this?
You will need to practice 4-step breathing for a duration of 3 5-minute. This short period of time is enough for you to appreciate its main benefits. Using it for a longer time has no particular contraindications, but it would add nothing.
How many times a day do I have to repeat this exercise?
In order for the 4-step breathing practice to take root, you will need to repeat the exercise 2 times a day. It's a total of 10 minutes: if you really want to find calm and tranquility, I'm sure you will find a way to carve out 10 minutes. Remember:
"The best time to relax is when we don't even have a moment to relax."
S.J. Harris.
I tried and felt my hands sweat and tingle, is this normal?
As mentioned, this breathing technique has no particular contraindications, but if applied hastily it could give you a slight feeling of discomfort: light head, tingling hands, sweating of the palms. Nothing to worry about, you just have to slow down the pace of breathing. If you feel these sensations it is because you are taking up too much oxygen. Slow down the inhalation and exhalation phases, and lengthen the pause. The ideal rate is 2-3 breaths per minute. Speaking of which, if you don't have a timer or something else, the ideal exercise duration is 12 breaths.
How soon can I use this technique in stressful situations?
As mentioned, it is of fundamental importance to start practicing this technique in a "protected" environment and in a state of calm, but it would be completely useless if we could not benefit from it when we are stressed. For this reason, in the next section I have brought you a program in 6 weeks to fully exploit the potential of this technique, especially in those moments.
A 6-week program to live more calmly
Through this gradual program you will be able to start using 4-step breathing in the most disparate situations, transforming this technique into yours little secret to stay calm, when everyone else around you seems to be going crazy.
By exploiting the principles of secret formula of memory (especially component # 1), I have prepared a little cartoon for you to help you memorize your "homework" for the next 6 weeks: have mercy, if I had known how to draw, I would not have been here to be a blogger! XD
Didn't you understand a club ?! How to blame you! I try to write that maybe it's better ;-)
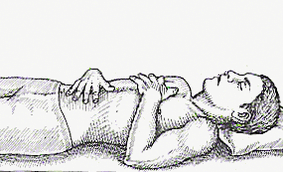
- Week # 1. Practice 4-step breathing lying down on a bed or sofa with your hands in position (left on the chest and right on the abdomen).
- Week # 2. Practice the breathing exercise, as usual 2 times a day, sitting on a sofa with your back reclined. Use a pillow to support your back.
- Week # 3. Practice the sitting breathing technique. Back straight, feet flat on the ground and legs forming a 90 ° angle. As with the previous weeks, keep your hands in place.
- Week # 4. Practice the standing exercise. The duration is always 3-5 minutes twice a day. Also in this case the left hand is placed on the chest and the right hand on the abdomen.
- Week # 5. Here things get a little complicated: you should practice the exercise standing, walking, but still keeping your hands in position. I realize that it is not easy to walk around with your hands resting on your chest and abdomen and not look a little… "strange". An excellent solution could be to practice this exercise early in the morning, during your "sacred hour". At the most you will scare some garbage men. But if you really don't have any alternatives, go straight to week # 6.
- Week # 6. Time to leave your hands in place and start practicing 4-step breathing more naturally, while you are walking, or in any other situation in your daily life (no, when you are in the bathroom it is not recommended!).
Starting from week # 6 you will be able to freely start using this relaxation technique even in moments of greater tension, immediately reaping the benefits you will have experienced over the course of the program.
Small bonus: if you want to immediately adopt a mental attitude based on calm and serenity, I suggest you read the story of the professor and the glass of water. Let me know what you think ;-)